Monday, May 30, 2011

In Memory of Our Honored Dead

We all need to take the time to honor those who have fallen in the line of duty for this great country. As we have unfortunately done with nearly every other holiday we have, we again have run ahead in celebration leaving the meaning and origin of the holiday far behind us.

Memorial Day (Decoration Day) began in the 1800's honoring those who had been killed during the civil war. As more wars came and more men and women were killed while in service to this country, Memorial Day grew to encompass many more fallen heros beyond those first early years. Some of you may remember, I know I do, when red poppy pins were sold to raise money for the families that had been left behind by these precious and courageous people. As time has progressed however, the poppies have faded from memory, proper flag etiquette is slowly loosing its meaning, and the many parades that were held across the country in remembrance of those fallen in battle are nearly a thing of the past. Sadly, many of us now are more concerned about what we are going to bar-b-que and where more than the how and the why we have reached this day safely in the first place. I am so sorry. So from my heart, I honor all of you who have generously laid down your lives... you have given your all, so that I and my family can continue to live freely in this wonderful country. THANK YOU!!!!


And for the dear families left behind, may God be your strength, your protector, and your blessed hope. I thank you as well.

Sunday, May 29, 2011

End of Feet Posts

Good morning sewing friends! I thought that I would end the month, along with my postings on feet, by sharing with you the walking foot and the quarter inch foot. As a quilter these two feet, along with a few others, are indispensable for making those quilts that you long to make for you and your loved ones. Again... can you make your quilts without these feet? Of course you can!! However... these feet are great in regards to helping you get the job done faster and easier.

I'm sure that most of you know what a walking foot is, but did you know that Bernina has come out with a new sole foot? (If you don't own a Bernina, check out your own make and model and see if they offer this new sole foot as well!) By watching the video, (click on the highlighted word above) you will see a demonstration of the two soles that come with the walking foot. What's not shown on the video however, is the newest Bernina sole which has a center blade. This makes stitching in the ditch a dream. You simply place the blade into any seam, stitch in the ditch, and voila! your quilts will have those perfectly quilted straight lines that you have been hoping for! Whatever make of your sewing machine, hopefully by sharing the videos from the Bernina site will help you understand how to use some of those speciality feet that are available for all sewing machine owners. Take a peek!


The quarter inch foot is perfect for those nice quarter inch seam allowances that are needed when making any quilt. Of course there are quarter inch feet available that have a guard on them to make sure that your quarter inch stays just that... a quarter inch.


No matter what kind of sewing you prefer, from garment, to quilting, to embroidery, to home sewing and more, trust me... there are feet available to you that you would not believe! I have only shared with you a very small few. It may not be cheaper to sew like it used to be, but you sure can make things that nobody else has..... and it shows off that wonderful creative side of you like nothing else can. So get busy..... start creating!!

Thursday, May 26, 2011

More Feet!

Here are a few more feet that make my sewing life so much easier!! Can you sew without all of these feet that I have shared with you... yes.... I just choose not to. These feet are great if you sew as much as I do and time, as they say, is precious.

The next foot is the 
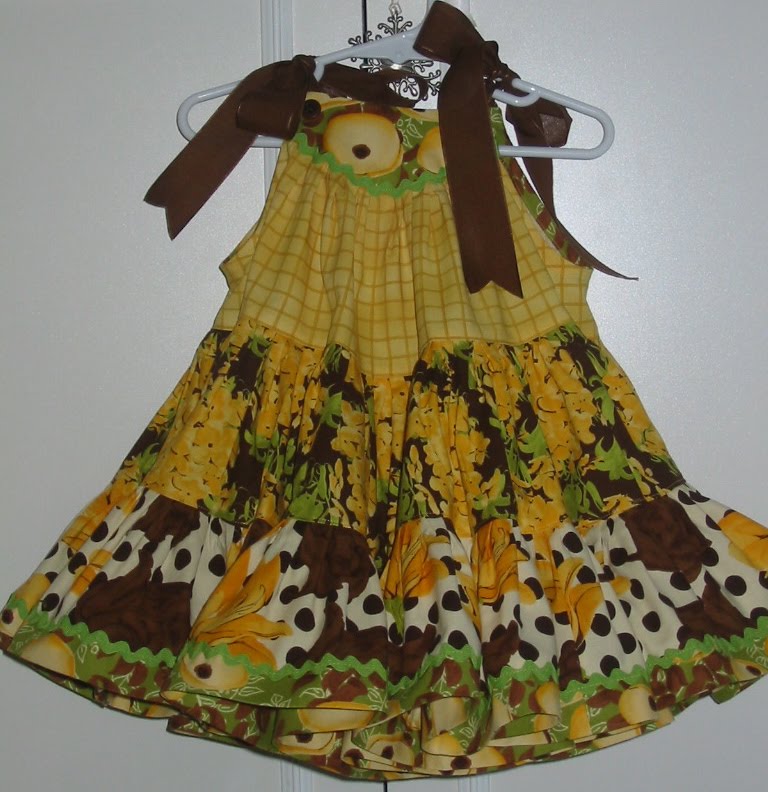
ruffler foot. I know that it looks a little scary, but WOW does it save time! I would never have made as many of Kari Mecca's dress, "Spring Fling" if I did not have this foot. With the rows and rows of long ruffles, I would probably still be working on that very first dress if it had not been for this foot. Again, watch the video to get the full information as to how this amazing foot works.


Here's a picture of the Spring Fling dress "in action". Little girls seem to love this dress because of how far out it can twirl... and as you know, this is very important! ;-)


Another great foot is the zigzag non-stick presser foot. There are also a couple of other non-stick feet available as well, the straight stitch foot and the zipper foot. I don't know about you but I have always disliked sewing over, plastic vinyls, oil cloth, or any treated fabric where my foot would just refuse to move or get stuck. Here's the answer!


Here are a couple of ideas for your next sewing projects using this foot.

First off? I guess you could call this a neck purse? I have made several of these in the past and love them. They have come in so handy if I am working at any show or traveling oversea. (This is what I took to Israel.) I can carry EVERYTHING in this little 'purse' and it goes nicely around my neck. The non-stick foot made this a cinch to sew together.


The inside:


Another foot that helped immensely on this particular project was the piping foot. I NEVER used this foot for piping... my 3 groove pintuck foot works far better. I found that this foot is absolutley perfect for when I am sewing on velcro... like in the above project. Because the foot is uneven from side to side, it is easy to place the thinner side of the foot on top of the velcro, with the fatter side on the fabric. What a difference!!


One more example of where I used the non-stick foot. I made this small backpack (thank heavens for fusible batting!) and I placed a clear pocket on the inside... along with many other pockets, I love pockets!!

The outside:


And the inside. Hopefully you can see the clear pocket. I placed a purple string inside of it.


I have made aprons, tablecloths, etc. using the non-stick foot. And I can't even tell you how many times I have used the piping foot when applying velcro! Great feet... all of them!!!

Tuesday, May 24, 2011

Piping....

I just had to share a few pictures of the projects that I have made where I have added piping by using the 3 groove pintuck foot that I spoke about in my last post. (We'll continue on with my love of specialty feet in my next post.) I must admit that I think I'm addicted to making piping!! In my opinion, piping just seems to add a nice finish to just about every project that I have made.

In the first picture, I am sharing again the picture of the dress that I made for one of my granddaughters. Finishing off the collar and armholes with piping made from contrasting fabric, to me, added a nice look to the dress.


I made the dress below with beautiful fabric by Liberty of London out of the UK. Instead of hemming the dress I decided to make a narrow ruffle for the hem and again made piping out of contrasting fabric to go in between the dress and the ruffle. I also decided to add piping to the collar as well. (Don't forget to click on any image to make it larger if needed.)


For my bed, I made pillow cases, along with pillow shams and a smaller pillow to place on top... my husband is always asking me why we have to have so many pillows for the bed. Here is a picture of just one of the pillow cases that I made. Every pillow has piping on it somewhere.


The smaller pillow is pictured below. I saw the embroidery design pattern at a show that I attended and loved what it said. So I purchased it, brought it home and hand embroidered it onto this fabric. Once I had finished the handwork, I then needed to make up a pillow pattern so that I could use piping and make the kind of ruffle that I wanted.


Here's just a few more ideas... which are endless by the way. ;-) I made this burp pad and sewed piping around the edges. The pad is lined with the softest flannel that I could find.


I made this apron and again, sewed piping between the body of the apron and the ruffle.


I'm telling you, I love the look of piping... as you can tell! But I wouldn't make it nearly as much if I didn't have my 3 groove piping foot! Try it.... you'll love it!

More Feet!

Since I talked about Heirloom sewing in my last post, as far as feet were concerned. I thought I would share the pintuck foot next... I own several... but for good reason. I am only going to show two different feet below and please, please, click onto Bernina's website to get more info on these feet. They have a superb, short video for you to view in regards to the decorative things these feet are capable of doing. You'll enjoy it!


After viewing the video, you can see why I own all of the various sizes of these feet. From the 3 to the 9 groove, I have used every one of them. The 3 groove foot (above) is a great foot to use when making your own piping. Truth be told, I prefer using the 3 groove foot for piping far better than the zipper foot... which I know many people use as well.


Should you step out and experiment with one of these feet, just make sure that you get the right size double needle... one that fits the 'channels' on the particular foot that you are going to use, and that you get the correct foot for the size pintucks that you are looking for. Again... take a look at the video and then go for it!!

Monday, May 23, 2011

Feet!

I own a considerable amount of speciality feet that I have purchased through the years to go along with my Bernina. For those of you who sew and own a sewing machine of your own, I'm sure that you are well aware of the feet that actually came with your machine.... at least I hope so. ;-) But have you ever looked at the speciality feet that are available that you can purchase for your machine? I always tell everyone that I have become a foot snob... at least when it comes to sewing. Since I sew so much, I like having these specialty feet available so that my sewing projects not only get done faster, but they also have a nice finished and professional look to them by the end of the project. Hopefully that's what you want too. I thought that I would share with you a few of my favorite feet beginning with the #10 foot.

For the Bernina we simply call it the #10 foot...but its real name is the edgestitch foot. This is a fantastic foot that has more uses than I could ever mention here on my little post. I use it a lot for heirloom sewing to sew laces, fabric or entredeux together... like I shared with you in my last post. That little blade that you see in the middle of the foot, can go into seams... when you want to 'stitch in the ditch'. You can use the blade as a guide for French seams. Or you can do what I did to join laces together with entredeux like the pictures below. Placing the lace and/or fabric on either side of the blade then using a small zig zag stitch to join them together gives you incredible results. Go to Bernina's website for more info!


I was trying to come up with different looks when making the christening gown. Here are a few examples that I made up for around the skirt of the gown.


I ended up liking this one the best. You can see the beautiful entredeux that I chose along with the Swiss insertion. The end result is the piece to the far right. I loved how delicate it looked and used it on a portion of the gown that I shared in my last post. Make up your own look and incorporate it in your next project!!! You won't be disappointed.

Friday, May 20, 2011

Heirloom Sewing

Anyone who knows me also knows that I adore Martha Pullen. I've been to five of her schools and I would go to every one of them if I could afford it. Martha and her staff are pure delight to be around and their enthusiasm is contagious.... I just wish their creative minds were as well. Martha is the 'mother' of heirloom sewing as far as I'm concerned. Should you have the opportunity to attend any one of her classes, trust me, jump on it! What I have learned from her and the instructors at her schools is priceless. Working with Swiss Batiste's and French laces is mesmerizing. They are so beautiful and so beautiful to work with.

Having shared all that I have above, it brings me to the reason for this post. My son married a wonderful girl whose family is Catholic. Coming from a Baptist background, making a Christening Gown never crossed my mind until my new daughter-in -law asked if I would be willing to make one of these gowns when her and my son had their first child. Since I had been making every other heirloom item under the sun, I thought I should at least give it a try. Right away Martha Pullen's patterns came to mind. She had two gowns custom made for her grandchildren. Below are the pictures of the two pattern books that represent each gown. Impressive aren't they?


Once I figured out just how much each one of these gowns would cost to make, I nearly fainted! Still... I was determined to make a gown for my family. I set to work designing my own gown and purchasing a medium grade of batiste that didn't cost nearly as much ($9-12.00 per yard) as the top grade ($29.00 per yard). It is unbelievable how much fabric these gowns, with matching slips require. The top picture of the dresses above took 7 1/2 yards... just for the fabric. This certainly does not include all of the different laces, Swiss entredeux, ribbon, beauty pins, etc.. Undeterred, I continued on my mission and here is what I came up with.

I did a lot of handwork on the dress, along with the slip but alas, you can't really see it. I'm so sorry that the pictures aren't the greatest, but hopefully you can get an idea of what the gown and slip looks like. The first picture is of the slip.


Here is the back of the slip. I did not want to stitch buttonholes into the fabric, so I handsewed little buttons on instead and used clear snaps on the inside back. I trimmed the collar and armholes with the prettiest, little lace that I could find. It was so dainty.


For the front, I made several rows of pintucks along with rows and rows of lace butted up right next to each other. (It's as though you were making your own fabric in a way.) I found a really nice embroidery design of a cross that I placed in the center front.


A close up of the embroidery design. As you can see, I combined a couple of different designs together to obtain the look that I was going for.


Thanks for stopping by!

Thursday, May 19, 2011

Waffle Weave!

There's a great children's jacket pattern, designed by Gooseberry Hill, that is adorable when made out of waffle weave. The problem now is finding waffle weave! We used to carry it at Pomegranate Quilts in various colors, as our customers loved it... and so did we. Once it was washed, it felt so soft... soft enough for Janet, who made a lot of our quilts, to actually make a cute, little baby blanket out of it! Darling!! The only waffle weave that I have been able to find on the market today is a whole different animal! The two sisters, 'poly' and 'ester' are now in the mix and it's no where near the feel, quality, or absorbency as the 100% pure cotton version that we carried.

I made several of these jackets and people seemed to really love them. This one was purchased as a baby gift for a family in Illinois. (As always click on picture for a closer view.)


Here it is in yellow.


And here is another one in red. These are short jackets so they look darling with a little pair of jeans!


I have also made this jacket in denim, which I had fun embroidering on the front and back. If you make this jacket, make sure to purchase great buttons and lace as these items are what truly make the jacket stand out!

Below are a few of the towels I made using the waffle weave as well. As you can see, it is easy to embroider on and dress up, just make sure that you prewash your fabric. Well.. that is if you can find it! ;-) The cotton version of this fabric, as I stated already, is very absorbent so these towels make great gift ideas for the kitchen... or anywhere really. (I actually got desperate enough to call the company, which is located in New York, and purchased several bolts for myself.... just in case they actually stop making it altogether.... a girl has got to do what she's got to do sometimes.) Keep those motors going gals... your machines. ;)

Tuesday, May 17, 2011

Sewing With Whimsy II

I wanted to share one more dress with you from Kari's book, Sewing With Whimsy. This dress is called, "Simple Sash Sundress". It's a beautiful, plain dress that can be changed to look either really dressy or quite casual. The simplicity of the pattern made it easy to put together in a hurry... which is exactly what I needed to do.

When one of my sons was getting married, I had the privilege of making the two flower girl dresses, the ring bearer's pillow, and the box where all cash, gift cards were to be placed. My future daughter-in-law loves hot pink, so that was her choice for an accent color. I found some gorgeous, hot pink silk dupioni on line, along with a nice dark brown for accent and set to work. Two of my granddaughters were the flower girls in the wedding so when the mom of one of them asked if I could possibly make just one more dress for my younger granddaughter I chose Kari's pattern.

There were two easy changes that I made to the dress. I don't know about you, but sometimes I feel as though the armholes are just a little too big. For me, I make a small, finished, v- shaped, piece that is similiar to the old fashioned 'dickies' that women used to wear in their blouses. It looks nice, if neatly done, and actually looks like it is part of the dress pattern. The next thing I did was make a nice, wide, extra long sashing out of the brown contrast color. I made the sashing wide so that I could gather it up in two places, then sew it onto the front of the dress. The two gathered rows became my sewing and placement guides. Since I did not want anyone to see those sewing lines, I covered them with up with a row of brown crystals. I also made piping out of the brown silk dupioni and finished off the neckline and armholes with that. The piping gave a nice finished look to the dress and I loved how it stood out on the pink. My granddaughter loved the dress, as you can see below, and danced the night away in her new dress. She looked pretty cute!


This is one of my flower girl, granddaughters with one of my grandsons, who just happened to also be the ring bearer. I made the flower girl dresses out of white silk dupioni and used the hot pink as a contrast on their sashing. I made their sashing the same as the dress above, but placed pink crystals on the sewing lines. If you have never worked with dupioni, you need to give it a try. Yes, it definitely frays but it is elegant when completed.


Here is a look at the pillow, which I embroidered the words of their wedding invitation on, along with the gift box, which I covered in the brown. Great times.

Saturday, May 14, 2011

Sewing With Whimsy

Kari Mecca from Kari Me Away is one of my favorite children's clothes designers. I have never been disappointed with anything that I have made using her designs and patterns.... and neither will you. You will find that your little ones will love to spin around in these pretty dresses. They are extremely full and deserve the names that Kari gave to each of them. I realize that I have shared many of these dresses in previous posts, but for those of you who may be new, I wanted you to see two of my favorite designs by Kari. They are fun dresses and hopefully you will enjoy them as well (Don't forget, if you want a closer look at any of the dresses, just click on the picture.)

The first set of dresses is made from the pattern called 'Adorable You'. I made various changes to each dress bodice to give them a more custom look. I never want any of the dresses I make to look exactly alike.


I made a little girl's purse to match the above dress and added a little glitz to it after taking the picture.


A look at the back.


A close up of the bodice.


I also did this one in pink, but changed the embroidery design and the look of the bodice by extending the dark fabric all the way to the armholes... unlike what I did with the above dress.


The back again. I like doubling up on the buttons to make them look more like flowers.


The second group of pictures are dresses made from the "Spring Fling" pattern. (I love these dresses!)


For those of you who might be interested in making one of these for your own little princess, here is the book. The gorgeous pictures along with 11 beautiful dress patterns will perk up any creative juices you may have. The tips alone are worth the cost of the book. Have some fun! Until next time.......