Thursday, November 17, 2011

Pinwheels!!

I adore pinwheel quilts! You can do so much with that type of pattern. Here are a couple of quilts that I recently finished using the pinwheel pattern as my base.

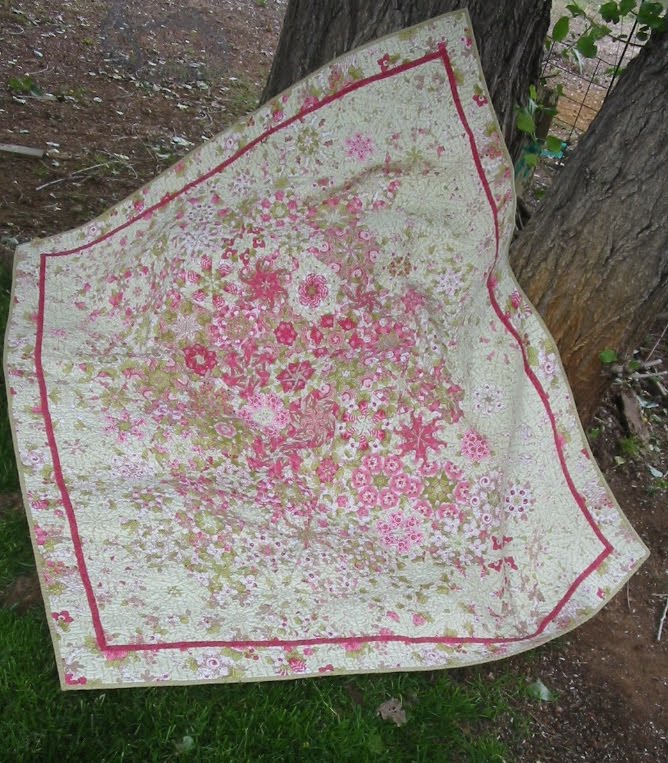
The first picture is of a baby quilt that I made for the shop where I occasionally work. Sharyn Craig designed this quilt and asked if I would test it out using her new Cutting Corners Ruler. Fabulous!! If you're a quilter, then you're more than likely very familiar with Sharyn. She is a joy to work with and not only full of creativity, but full of life as well. When she's around, the whole place simply lights up! I felt it an honor to work on one of her new patterns and try out her latest ruler. Fun!!

Here is the quilt:


Here's the ruler:


When I was president of a local quilt guild several years ago, one of the many ways in which we raised money was to sell 'stitch and wins' to our many members for $1.00. The gals loved buying these 'stitch and wins' and would willingly buy as many as they could in hopes of winning all of the completed blocks. In case you're not familiar with 'stitch and wins' let me explain. Each of us, as members of the guild, took turns every other month coming up with an easy quilt block pattern that we felt everyone would enjoy making. The one in charge of the 'stitch and win' for the month would also purchase a challenge fabric that she felt would go nicely with the pattern that she had chosen. She would then place a copy of the pattern, as well as a piece of the challenge fabric, in a small sandwich baggie and sell them to the members who were eagerly waiting to buy them. Once a member got home with her little baggie, she was to read over the pattern, find any fabric that she had in own stash and sew the block together. (Because each of us used our own fabric and then added it to the challenge fabric it guaranteed a block that was unique and one of a kind.) Once your block was completed, you simply brought it with you to the following meeting and you were given a ticket for each block turned in. I normally purchased at least two baggies of 'stitch and wins'. And, like everyone else, always hoped that I would somehow win all of the completed blocks that these wonderful quilters had made.

The following picture is of one of my 'stitch and win' quilts. I was blessed to win a group of 'stitch and win' blocks twice!! As you may suspect, some blocks that would be turned in would be quite pretty and some would be....... Anyway.. with this quilt I used all of the blocks... well... except for one. The gal who had come up with this 'stitch and win' drawing gave me all of her left over challenge fabric... (yippee!) which I used on the outer border. I purchased the darker fabric for the inner border and binding. I decided to give the quilt a scalloped finish due to my love of scallops!


If you have some blocks that you don't know what to do with, lay them out on the floor and put your creative mind to work and have fun!!

Wednesday, November 16, 2011

Thanksgiving!!

Last Christmas, I shared with you some kitchen towels that I had made for my family as gifts. I decided to make a few more towels for Thanksgiving. There is a wonderful design company, Vermillion, that makes gorgeous embroidery designs that look as though you had taken the time to do some cross stitch. I love how these designs come out on the fabric. Even on this waffle weave fabric, the cross stitch design comes out perfect.


Here is the design packet that I used... I can't wait to do the turkey!!


I've used these designs on several of the stockings that I have made in the past. So, so pretty!


And here are some great designs to stitch out on towels:


I was playing around with one of the designs above and decided to add the words below the design.


One of these days, I's hoping that I will be able to make the pictures a little more clear for all of you. ;-) In the meantime, simply click on the pictures for a closer view.

Have a blessed and happy Thanksgiving with those you love.. I sure am!

Tuesday, November 8, 2011

The Twelve Days of Christmas

I have always loved the song 'The Twelve Days of Christmas'.... even more so after I read about its actual, historical, origins several years ago. Did you know that it had a very serious purpose when it was first written? Because Catholics were severally punished and often times put to death for practicing or sharing their faith..... privately or publicly... they created this musical allegory to instruct their young people in regards to the great love that God had for them. What a way to witness and carry the message of Christ on to future generations! I may not be a practicing Catholic, but as a christian, I admire their determination to teach the message of the Good News of Jesus to their young and to those who still don't realize just how "good" this news truly is. Here's some of the words to the song along with their original intent:

1. Partridge in a Pear Tree= Jesus Christ, Son of God
2. Turtle Doves= The Old & New Testament
3. French Hens= Faith, Hope & Charity
4. Calling Birds=The Four Gospels, which sing the song of Salvation
5. Gold Rings= The First Five Books of the Old Testament
6. Geese= The Six Days of Creation
7. Swans a-Swimming= The Seven Gifts of the Holy Spirit
8. Maids-Milking= The Eight Beatitudes
9. Ladies Dancing=The Nine Fruits of the Holy Spirit
10. Lords a-Leaping= The Ten Commandments
11. Pipers Piping= The Eleven Faithful Apostles
12. Drummers Drumming= The Twelve Points of the Doctrine in the Apostle's Creed.

Maybe some of you are already familiar with the original meaning and intent of this song, but as I shared above.. I wasn't until several years ago and it has made me enjoy listening to this particular song even more so today than when I was a little girl.

So now... after sharing this information with you, I thought I would share one of the latest projects that I have been working on. I saw a book, written by Fons and Porter entitled, "Best of Fons & Porter Tabletop Quilts". I thought that the picture on the front cover was pretty cute, but I wanted a more elegant table topper for the holidays than what was presented in the book... hence, my version of this table topper is shown below.. notice the Partridge in a Pear Tree:


I used quite a bit of metallic thread in each design and had no problems at all as I used, "The Amazing Thread Guide" that I shared with you in a previous post. (I did not even need to use a metallic needle or slow my machine down!) It worked beautifully!

Here is the book that I was referring to:


More to come in future posts Have a great day!

Friday, September 23, 2011

One-Block Wonders

I don't know if any of you have ever made one of these beautiful quilts before, but I absolutely love them! It is similar to making a stack and whack quilt in which you stack the fabric on top of itself where it repeats, then cut. My friend Sharon made this particular quilt. I think it's simply beautiful! I loved her fabric choice , and I especially loved how she laid out each block to get this particular look. One fabric choice made all the different looks you see in this quilt.... one fabric. Hint... if you want to know what the fabric looked like before she stacked it up and cut it... check out the border. (Click on the picture itself for a closer peek.) Incredible isn't it?


Here's the book. More books have come out since this one was published, and the designs that one can come up with are endless. Take the initiative and get your creative genes flowing..... you might be pleasantly surprised!


Happy quilting!! Debbie

Monday, September 19, 2011

Can I Just Say.........

Wow... water leaks are slightly messy! Between the drywall dust, the plastic tarps everywhere, and all of the paraphernalia needed to re-pipe our entire house, it has been rather crazy around here. Sewing is what keeps me sane, so I needed to simply sit down and complete something! I decided on the dress/top that I had started working on before this whole mess began.

The dress was for my granddaughter Keira who is rather tall. She may be only 4 years old, but her height is in the upper 98 percentile of other kids her age. When I had her try on the dress yesterday it was rather comical. It definitely fit her more like a top than a dress.... one just had to laugh. The pattern? Beverly Belle by Izzy & Ivy. My mom had picked up the pattern while visiting friends recently in Iowa.

The pattern itself is $12.50 yet there is only ONE pattern piece on the inside.... ONE. I have never made a pattern quite like this before so was anxious to see how it was going to turn out. If Izzy & Ivy ever asked for suggestions, I would definitely make this one.. list everything one would need to complete this dress on the OUTSIDE of the pattern! Not until you open the packaging do you realize that you need 8 yards of double folded bias tape... or 1/2 yard of contrast fabric to make your own. You also need 3 yards of 3/8" of elastic. I think both of these should have been listed on the back of the pattern along with the fabric requirements. If I were a young mom who saw this darling pattern... and I was a new to sewing, I would have been so disappointed if I got home and realized that I didn't have all that I needed to complete my project. I always have everything I need as I live so far out in the country. I'm just sayin.........

Anyway... here is the actual dress/top. I think the design is pretty cute and I know my granddaughter will have fun wearing it... it twirls.. which is a main requirement with her. ;-)


I had to take another picture so that you could see all of the apples coming on. My trees are loaded! I can't wait for some fresh apple pies... neither can my kids!

Sunday, September 11, 2011

Water Leaks Continued!

Here are a few pictures of our mess. I can't even tell you... or show you the entire mayhem that is going on around here. Once we get all of the holes fixed in our home and I am able to put things back in place, I will return.

How it is looking on the inside..one of the many rooms affected:


One of the many holes in those many rooms!

Friday, September 9, 2011

Water Leak

I was planning on showing you a dress that I have been working on but due to a water leak in our slab, on top of loosing our electricity yesterday, my plans have slightly changed. We are now working on getting our entire house re-plumbed.... no small feat. I will return........

Prayers are encouraged here.... thanks! ;-)


Have a great week end!

Friday, September 2, 2011

The Dresses

This will be a quick post so that you can see the dress that I made for my granddaughter who lives in Kansas. You will recognize the dress from a previous post, however, seeing the dress on is always nicer, don't you think? Since none of these granddaughters live nearby, I could not make any adjustments to the back piece that I had elasticized by using elastic thread. I would have cut the back piece smaller on Ashlynn's dress... maybe even Reilly's.

Again, the pattern is designed by Izzy & Ivy and is called 'Kayla Bubble'. As you can see by the picture, I did not make the bottom portion of the dress into a bubble as instructed, but instead added a contrasting piece of fabric and then simply hemmed it. Also.. remember that the girls wanted their dresses longer as that apparently is the current style.


The dress on:


The back of the dress....


Here is one more picture of the dresses that I made for my granddaughters who live up in Sacramento.... a day out with their dad, my son.


Have a great weekend and come by for a visit again!


Wednesday, August 24, 2011

Re-doing The Towel!

In my last post, I shared a towel idea that I thought you might like because it is quite easy to make..... and rather inexpensive as well. (This particular towel was only $3.95) Those two words, 'easy' along with 'inexpensive', rate pretty high in my book. I was mad at myself, in regards to the last towel, because I had placed the design much too high on the towel. While making a new one, I thought I would take a few pictures of the process and share them with you.

Here are those pictures. Hopefully, each shot will help you in your own process should you decide to make this same towel.

In the first picture, I wanted you to see the little gadget that I use when sewing with metallic thread..... which I used quite a bit of on this towel. When this little item first came into the shop, I was rather apprehensive as to how it would really work.... I almost didn't even purchase it and that, my friend, would have been a BIG mistake! If you have ever used metallic thread in the past you know very well that metallic thread seems to have a mind of its own due to how it is wound on the spool. It naturally wants to twist and turn every which way.... very much unlike normal thread. As it unwinds from the spool while sewing, this wonderful gadget forces it to come off much straighter thus preventing breakage. My thread did not break once.... and you can see how much I used... a lot!! No wonder it is called, The Amazing Wonder Thread Guide. It made working with metallic thread a pure joy.

Here's the sweet, little gadget:


And here it is on my machine.


I would be remiss if I didn't mention my favorite metallic thread.... Yenmet. I have tried many different brands of metallic thread, but nothing compares to this great thread. It's the only brand I now have in my collection of metallics!


After I washed my towel, pressed it with spray starch, and made sure that the corner for hanging it was at the top, I hooped the towel up using a black, heavyweight, cut away stabilizer on the back of the towel and a clear, aquafilm topper on the front of the towel due to the open weave. I wanted to make sure that the embroidery design, as it stitched out, did not get lost into that open weave.

Here's the front with the aquafilm topper:


Here's the back with the black stabilizer:


I decided to draw out the reindeer portion of the design onto a piece of 'Steam A Seam 2" and ironed it onto the wrong side of the fabric that I had chosen for the reindeer. I then carefully cut out the reindeer and once it came time to add the applique of the reindeer onto the design, I merely placed it in the designated place, right side up, then continued the stitch out until the design was completed.


Here is the finished reindeer design:


Now for the bottom ruffle. First, cut a piece of fabric 8" x the width of the fabric. (Approximately 42-44") Fold the fabric in half lengthwise, right sides together, and sew the two short ends together using a 1/4" seam. Turn the fabric piece right side out, pressing it well, then divide it into four equal sections marking it carefully. Once the fabric piece is marked, do the same to the towel. Gather the fabric piece to make a nice ruffle. By marking the towel and the ruffle you can now match the ruffled fabric evenly to the towel. Pin well then sew together the ruffle and the towel making sure that the ruffle is sewn on to the BACK of the towel. The ruffle should appear evenly spaced.

Before ruffling..... Here's a picture of one end of the ruffle piece.


Here's the back of the towel with the ruffle sewn in place.


Press the ruffle towards the front of the towel, as shown below:


Notice that you now have the raw edge of the ruffle on the front of the towel. To cover that raw edge, you need to cut a piece of fabric, 1 1/2" X width of towel, plus an additional 1 1/2" on each end of the strip of fabric. Turn in the 1 1/2" that you added on each end of the strip towards the center of the towel. Using a 1/2" seam allowance, sew strip to the raw edge of the ruffle (do not sew down onto towel yet.) making sure that the ends of the strip are folded in. Once sewn on, tuck the top raw edge of the strip over and behind the raw edge of the ruffle piece and now... sew neatly and securely to the towel.

Here's how the back of your towel should look... nice and neat!


Voila!! I decided to add piping and glitz to my towel. and you can easily do the same...... or any other creation you desire. Have fun!!


Tuesday, August 23, 2011

Another Idea!

I brought home this black towel from the shop last Saturday as requested. My co-workers wanted me to come up with an idea, for the holidays that are quickly approaching us, using this black towel as the main focus. (The store has an abundance of these black towels and they needed a plan on how to sell them!) As I walked around the shop, I looked for fabric that I thought might possibly match, but would also welcome in the coming holiday season. I noticed that we had a couple of bolts of this reindeer fabric, as well as the coordinating stripe fabric. Once I got home, I looked for just the right reindeer design to add to the towel. I also wanted to add the word 'Peace' in some kind of swirly type of font. Below is what I came up with. My mistake? placing the design way too high on the towel! However... I realize what I did wrong and my next towel will be perfect!

I share it here with you to show another example of, what I think, is a great and inexpensive gift idea. The towels are rather cheap and can be found just about anywhere. Just make sure the you prewash your towel! For the ruffle I cut the reindeer fabric 7 1/2" x whatever the width of your fabric.... this one was about 44". The striped fabric was cut 1 1/2" by whatever the width of your towel plus 2". (Make sure you click on each picture for a closer view if needed.)


What do you think? Easy, easy. Have a great day!

I don't like the back of anything to look unfinished or undone so I wanted to make sure that you got a view from behind.


Saturday, August 20, 2011

Missed One

In my last post, I forgot to add this photo of Cash's newest burp pad. I have made him a couple now..... mainly because I needed a few more samples for the shop on how to make piping. These little pads are quick and easy to make and once you get your own creative juices flowing, I'm sure that you can come up with other fantastic ideas that can be sewn or embroidered on. With the economy going the way that it is, we all need to come up with different ideas for gifts in regards to the coming holidays. Does anyone else have more economical gift ideas? I'd love to hear them. Have a great week!

Friday, August 19, 2011

Wallets!

Soooo, I am still making wallets to give as gifts.... I'm not exactly sure how many I have made so far..... but I think they are a great gift idea to give to people that you know.. but you just aren't sure as to what they really need or what they really want. If you'd like... throw in a gift card or two as well... especially to places you know they would enjoy. The wallets are fairly easy to make and I can honestly say that I wouldn't mind getting one myself. ;-)

I made a couple out of the pink University of Arizona fabric for my niece and my sister-in-law.... I even embroidered their initials on the inside.. below is the one I made for my sister-in-law. Here's the outside:


Here's the inside:


This next one is for my daughter-in-law. I know that she gets a lot of gift cards for her birthday, christmas, anniversary... etc.
Since I know she enjoys getting those gift cards, I'll just give her one from me inside of this little wallet. Here's the outside:


And here's the inside:


I have also been making more of these little bags. They are perfect for throwing one of the above wallets in, along with a license, car keys, cell phone, etc. This one is for Liz, my sister-in-law. The outside:


The inside:


For my niece, who I made the pink University of Arizona wallet for, I made her bag out of the traditional colors of the U of A. Since she just had a new baby boy, I made the bag a little more 'boy' friendly.

For my other niece, who also has a sweet little baby boy, I made her bag out of the cutest baby fabric ever. I made her a wallet to match. I had already mailed both their gifts before posting. But if you need a quick baby gift idea, make one of the bags like I have shared in previous posts.... and here, sew together a matching wallet, throw in a couple of diapers, wipes and maybe a gift card or two, and voila.... a gift no one else could possibly give! Keep sewing... and thanks for stopping by!

Friday, August 12, 2011

Dressing Up For Summer.

Again.... I am making dresses. I suppose there will never be an end to sewing.... and quite frankly, that is just fine with me. I shared in a couple of posts back the two dresses that I made for my granddaughters who live up north. I have two more granddaughters who live in the midwest... for the oldest I made this dress.

The first picture is of the front of the dress...... I purchased the darling buttons in an adorable shop in Oceanside... Maisonnette. Take a look at their webpage. I brought home two of every color button that they had! Great shop.


The second picture is of the back. Again, I used the elastic thread in the bobbin.


If you haven't tried the elastic in the bobbin yet, give it a try. I'm confident that you will enjoy the results and so will the one who wears it!! Questions??

Monday, August 8, 2011

What Is a disciple?

The die has been cast. I have stepped over the line. The decision has been made--

I am a disciple of Christ!

I won’t look back, let up, slow down, back away, or be still.
My past is redeemed, my present makes sense, my future is secure.
I am finished with low living, sight walking, small planning, colorless dreams, tame visions, mundane talking, chintzy giving, and dwarfed goals.
I no longer need preeminence, prosperity, position, promotions or popularity.
I don’t have to be right, first, tops, recognized, praised, regarded, or rewarded.
My face is set! My goal is heaven! My road is narrow! My way is rough
but.....
My Guide is reliable and my mission is clear.
I cannot be bought, compromised, deterred, lured away, turned back, deluded, or delayed.
I will not flinch in the face of sacrifice, hesitate in the presence of adversity, negotiate at the table of the enemy or meander in the maze of mediocrity.
I won’t give up, shut up, let up or slow up
Until I’ve preached up, prayed up, paid up, stored up and stayed up for the cause of Jesus Christ.
I am a disciple of Jesus. I must go until He comes, give until I drop, preach until all know and work until He stops me.
And when He comes to claim His own, He will have no problem recognizing me, my banner will be clear.

(This letter was nailed to the door of a young pastor’s home in Zimbabwe, Africa who had suffered severely for his faith. and was eventually martyred)


“With His Finger God wrote on the stone,
None could change it
None erase it.

My sin smashed the stone
broke His heart
impaled the Author on a cross-beam

Now His Finger writes again----------
again on my heart.”

Hermom Pettit

Years ago when I was listening to a message on a tape recorder, the speaker was reading the above passage in regards to, What Is A Disciple. It touched my heart in such a way that I replayed the tape over and over again until I was able to write out the entire message that the young pastor had written to his persecutors. It made me question myself as to how I would respond if persecuted like he was. Then a couple of years later my dear friend, who has since passed away, gave me a book with the bottom quote that I have also shared with you. It has been well over 25 years now since I first heard these passages but I still read these precious nuggets periodically to not only remind me of the greatest of our Great God but to also bring comfort in times of unrest. For that reason, I am now sharing them with you. "Greater is He Who is within you than he who is in the world." Blessings.

http://www.youtube.com/watch?v=PFZyT2fEK3I&feature=related

Wednesday, August 3, 2011

Updates

Lately I've been so busy sewing that I have had little time to post on my blog. I have also been working more, as well as teaching more at the shop. The 'Beginning Sewing" classes have been full due to the Groupon offer that the store owner sent out through people's emails. If you read my blog, 'Groupon Nation", you would see just what I have been teaching these first time sewers and the project that they put together in my class. Each one of these gals has been successful in completing their zippered bags and each has been very happy with their results..... that in turn makes it easier and more rewarding for me.

If you missed out on that blog... here is another sampling of what the gals make. I made another bag for Cash and again placed a pocket on the inside for nursing pads, keys, license... whatever.

Here's the outside view with his initials on one side... (Again... if you would like a closer view, click on any of the pictures.)


The backside....


The inside..


Here is yet another project, a burp pad, using your wider pin tuck foot. As I shared in an older post, this foot is great for making piping.


I also made this kitchen towel... again using the pin tuck foot to make the green piping, and I then embroidered a poinsettia above the added fabric.


I also made a gift card wallet for my daughter Nicole. This is a great, easy pattern... and not bad to give with a gift card enclosed.


And the last photos are of my granddaughters wearing the dresses that I made for them for the summer. Too cute aren't they?


Again... thanks for stopping by! Have a blessed week.