
Here are those pictures. Hopefully, each shot will help you in your own process should you decide to make this same towel.
In the first picture, I wanted you to see the little gadget that I use when sewing with metallic thread..... which I used quite a bit of on this towel. When this little item first came into the shop, I was rather apprehensive as to how it would really work.... I almost didn't even purchase it and that, my friend, would have been a BIG mistake! If you have ever used metallic thread in the past you know very well that metallic thread seems to have a mind of its own due to how it is wound on the spool. It naturally wants to twist and turn every which way.... very much unlike normal thread. As it unwinds from the spool while sewing, this wonderful gadget forces it to come off much straighter thus preventing breakage. My thread did not break once.... and you can see how much I used... a lot!! No wonder it is called, The Amazing Wonder Thread Guide. It made working with metallic thread a pure joy.
Here's the sweet, little gadget:

And here it is on my machine.

I would be remiss if I didn't mention my favorite metallic thread.... Yenmet. I have tried many different brands of metallic thread, but nothing compares to this great thread. It's the only brand I now have in my collection of metallics!

After I washed my towel, pressed it with spray starch, and made sure that the corner for hanging it was at the top, I hooped the towel up using a black, heavyweight, cut away stabilizer on the back of the towel and a clear, aquafilm topper on the front of the towel due to the open weave. I wanted to make sure that the embroidery design, as it stitched out, did not get lost into that open weave.
Here's the front with the aquafilm topper:

Here's the back with the black stabilizer:

I decided to draw out the reindeer portion of the design onto a piece of 'Steam A Seam 2" and ironed it onto the wrong side of the fabric that I had chosen for the reindeer. I then carefully cut out the reindeer and once it came time to add the applique of the reindeer onto the design, I merely placed it in the designated place, right side up, then continued the stitch out until the design was completed.

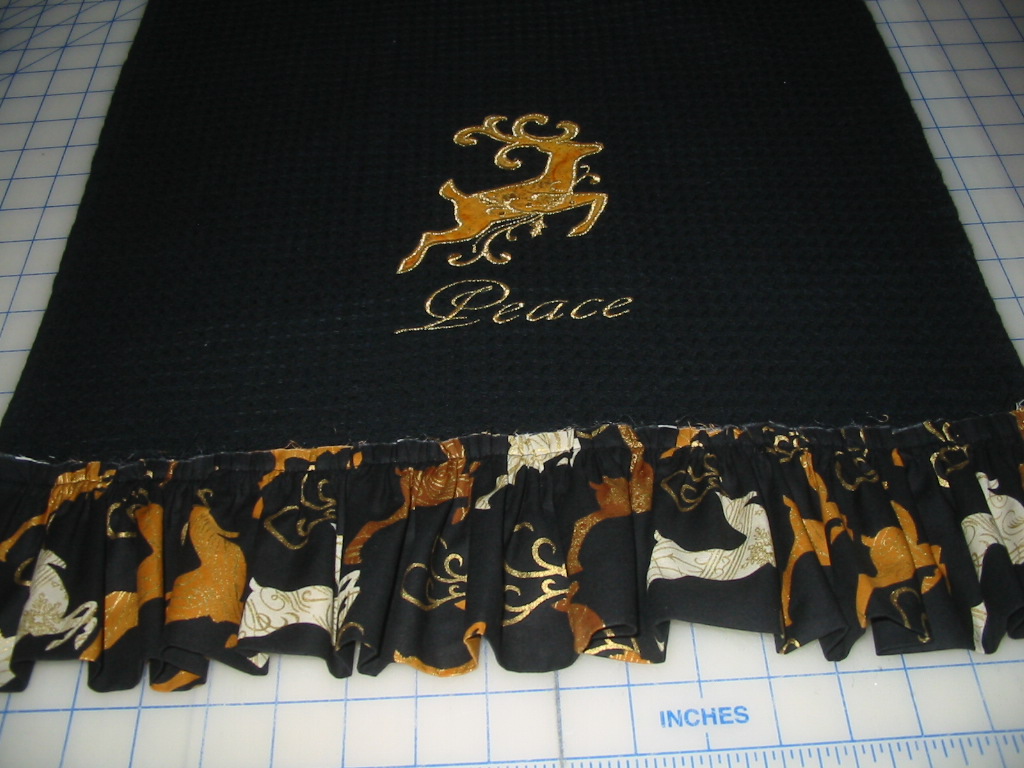
Here is the finished reindeer design:

Now for the bottom ruffle. First, cut a piece of fabric 8" x the width of the fabric. (Approximately 42-44") Fold the fabric in half lengthwise, right sides together, and sew the two short ends together using a 1/4" seam. Turn the fabric piece right side out, pressing it well, then divide it into four equal sections marking it carefully. Once the fabric piece is marked, do the same to the towel. Gather the fabric piece to make a nice ruffle. By marking the towel and the ruffle you can now match the ruffled fabric evenly to the towel. Pin well then sew together the ruffle and the towel making sure that the ruffle is sewn on to the BACK of the towel. The ruffle should appear evenly spaced.
Before ruffling..... Here's a picture of one end of the ruffle piece.

Here's the back of the towel with the ruffle sewn in place.

Press the ruffle towards the front of the towel, as shown below:
Notice that you now have the raw edge of the ruffle on the front of the towel. To cover that raw edge, you need to cut a piece of fabric, 1 1/2" X width of towel, plus an additional 1 1/2" on each end of the strip of fabric. Turn in the 1 1/2" that you added on each end of the strip towards the center of the towel. Using a 1/2" seam allowance, sew strip to the raw edge of the ruffle (do not sew down onto towel yet.) making sure that the ends of the strip are folded in. Once sewn on, tuck the top raw edge of the strip over and behind the raw edge of the ruffle piece and now... sew neatly and securely to the towel.
Here's how the back of your towel should look... nice and neat!

Voila!! I decided to add piping and glitz to my towel. and you can easily do the same...... or any other creation you desire. Have fun!!


2 comments:
Wow, that came out cute!! Good idea for the fabric :-).
Thanks Elizabeth! It really is simple. Hopefully my instructions make sense and people can figure out how to make it. Love you, mom
Post a Comment